blogging -->

2023 ഒക്‌ടോബർ 17, ചൊവ്വാഴ്ച

How to start your own blog in 2019 | blogger.com

blogger.com, blogger templates, bloggng


Whether you ’re passionate about blogging, or want to start a blog or website, but still looking at the sky and worrying about your programming skill, then you are at the right place. This guide will solve all your worries and help you start a blog in 2019.  Who told you that you can’t start a blog/website without any programming knowledge. I‘ll show you how to do that.


What is Blogger


Blogger is a free blogging platform Provided by Google. It was developed by Pyra labs but in 2003 Google has bought the service. The blogs are hosted by Google and generally, it can be accessed from a subdomain  of " blogspot.com " and also by connecting a custom domain purchased by the user
using DNS facilities to direct the domain to Google's servers.

How can you earn money from blogging


Google provides its own advertising services to monetize your blog known as Adsense. If your blog has unique content and good traffic you can apply for Adsense.

Create your first blog


To create your first blog on blogger, just go to Blogger.com and sign in using your Google account.

If you don’t have a Google (Gmail) account, then signup for one, then go to blogger.com

For a first time user, you can see a welcome page like below. You need to enter a name here for your blogger profile.


then click continue to blogger, now you will reach blogger dashboard, from here you can create your first blog


click new blog from the left side of your dashboard and click create new blog.

now you have to type a name and address for your blog. the address will be shown as yourname.blogspot.com. You can change it later when you buy a custom domain.


pick the right name for your blog. Avoid using your personal name as the domain name, because, if you use some generic name for your domain, you can brand it later with a custom domain. After that select a template (you can change it anytime), and click on “Create Blog”.

Now you have created your first blog, and you can see it by typing the address (yourname.blogspot.com).

but you are not done yet!

There are a few settings that you need to do on your new blog to make it easy to use

Now you will be at the Blogger dashboard where you can see your blog’s backend.

From here you can go to “Settings” and make changes to improve your blog's visibility. Here is a screenshot of what you should be seeing:
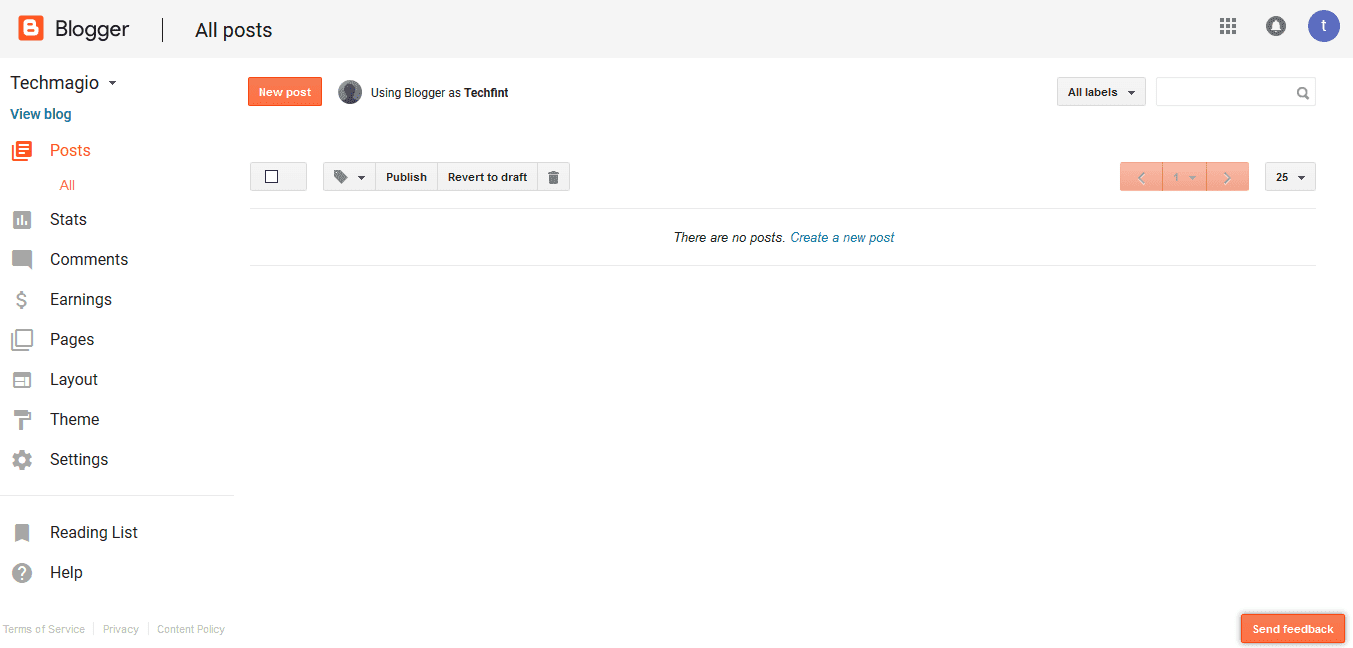

Now you have a blog, you can start writing posts for your blog from “posts“ > “new post“. 

But before writing your first post, we recommend that you create at least an “About” page describing who you are and what your blog is about.


 Add Pages

A page saying about you and your blog is a very important factor on your blog. It will help new peoples understand about you and your blog, provide the correct information on your about page.
And a contact us page on your blog to help the readers contact you.

To create a page go to  Pages and click on new page, and type your information

Also add a disclaimer, and privacy policy, terms of use, pages. It will help you for Adsense approval in the future

Change Theme

Now you have a blog, but I know you're not satisfied with the boring looking of your blog. But don't worry you can change your theme and make it a professional looking blog. There are many websites providing free templates for blogger blogs, you can download files from respective sites and upload on your blog. I have listed some of them below, visit those sites and download your theme.

Since the templates are free they don't allow you to remove footer credits so you need to purchase one if you want to remove footer credit.

You can use the templates by giving them proper credits.

#1   Templatesyard  
#2   Gooyabi Templates  
#3   Sora Templates 
#4   Themexpose

The theme file you downloaded will be in zip format, so you need to extract it. Then you can see a .xml file in the theme folder. this is the file you need to upload.


To change your theme go to Theme => Backup /Restore, then a box like below appears. Click on Browse and find theme folder and select the file (.xml)

Click upload | Your new theme will be uploaded soon


After uploading the theme you need to customize it, look in the theme folder for the documentation file, and customize your them with the help of it,

if it's very hard for you, then contact me, I will do it for you.

Was this post helpful? If so, would you consider sharing it with others who might appreciate it as well? Thanks!

Also, read

∎   Free blogger template without footer credit
∎   How to add simple Buttons in your blog posts
∎   How to remove date from blogger permalink
∎   Remove "Showing posts with label...." on blogger blog


2019 ജൂലൈ 17, ബുധനാഴ്‌ച

Blogger Template Without Copyright for 2019


blogger templates without copyright, blogger templates without footer credit

Blogger Template Without Copyright | Are you searching for a blogger template without footer credit, then this article is for you. Premium themes are not manageable for everyone, and most of us go for cracked and free themes with footer credits. 


Almost no one like the footer credits and go for hiding and crack the themes, although this is illegal it also cause legal issues. First of all, it is not suggested to use cracked themes or credits hidden themes because it will affect your SEO badly(Google doesn't like hiding scripts in your page which is regarded as a negative point to your Website).

So here we are introducing the best free blogger template without footer credit


Free Blogspot Themes


Most of us would have searched for free Blogspot themes, but we also know that no website will provide Blogger templates without copyright and encrypted scripts. This article would be useful for all bloggers who are looking for a completely free blogger theme.

Is there an actual theme which allows us to remove footer credits?

The Answer is Yes!

Check out the Pixel Theme by Blossom Themes Below!

Pixel Free Theme | Blogger Template Without Copyright


Pixel theme created by blossom theme with no encrypted script and completely open-source coding. Furthermore spectacular features like featured gadget and featured sidebar, etc. are preloaded with this theme. Above all, the theme is well customized.

Note: This template is free for commercial and private use.

Features of Pixel Theme


  •  Ad Ready
  • Responsive and SEO Friendly
  • No Encrypted Script
  • Featured Widget
  • Customized Widget
  • Custom Sidebar Widget
  • Author Description
  • Footer Credit Replaceable

Ad Ready


blogger templates without copyright, blogger templates without footer credit

The completely optimized theme for Adsense and just replace the Code with your Ad code. Furthermore, it comes with Top and Side Ad widget.

Featured Widget

blogger templates without copyright, blogger templates without footer credit

Featured Widget is very beautiful and well customized. Awesome post layout compared to other free themes.

Post Layout

blogger templates without copyright

Customized Post Layout with boxed content description. We can customize the number of posts shown on the Homepage from the theme layout section.

Theme File and Documentation


Download this theme from the below link and freely edit the footer credit. Follow the documentation and customize your blog as you prefer.

If any of the download links are not working properly please contact the admin or just comment below to notify us.

How to Edit Footer Credits


Footer credit is already configured with your Blog title and URL. So you don't have to edit the HTML file and I have already removed the Owner Credit (This is completely legal and without any Redirection).

Conclusion | Blogger templates without copyright


Hope you enjoyed this article on Blogger Template Without Copyright. Please comment on your valuable suggestions and improvements.

If you have any doubt regarding this post or related to this category you can freely contact us.


2019 ജൂൺ 17, തിങ്കളാഴ്‌ച

How to add Ads.txt on blogger


So guys welcome to www.techfint.com, Today we are providing a tutorial How to setup ads.txt file on blogger.

If your blog is monetized with third-party providers or you’ve manually integrated AdSense in your blog, you will need to manually set up the content of the ads.txt file.


What is ads.txt?


Ads.txt is an initiative of the interactive advertising Bureau Tech Lab (IAB) to promote and increase transparency in advertising programs. this is an easy way for AdSense publishers to clearly show buyers who are authorized to sell their inventory.

Actually for Blogger Ads.txt already exists before. but now, you can edit ads.txt as desired and for friends who get a warning message like this

Earnings at risk - One or more of your sites does not have an ads.txt file. Fix this now to avoid severe impact to your revenue

On the Google Adsense dashboard, Google recommends that you activate ads.txt on the blog

How to activate Ads.txt on Blogger


To activate Ads.txt on Blogger, Go to Blogger Dashboard > Settings > Search preferences > Monetization > custom ads.txt > then click edit select yes and paste the following code in the box ads.txt.


google.com, pub-0000000000000000, DIRECT, f08c47fec0942fa0


  • Replace pub-0000000000000000 with your Adsense ID then click save changes.
  • Adsense ID can be found on your Google Adsense Dashboard like this


To check whether Ads.txt is active, you can check the browser search tab with a link like this

http://<your blog address>/ads.txt


Conclusion


I hope you found this article how to add ads.txt in blogger useful. if you have any doubts regarding this post please comment below. we are happy to help you


2019 ഫെബ്രുവരി 20, ബുധനാഴ്‌ച

Demo and Download Button For Blogger | Material Design

Download button, Download button in html


Demo and Download button | Material Design - Hello Guys Today I am gonna show you how to add Demo and Download button with material design on blogger.


We all know by default we cant use buttons in our posts since no blogger template provides such features except templates provided by SoraTemplates. They provide some good features in their template either it is free or premium.


Download Button | why ?


Why it has important role in blogs ??  Why we need to add these buttons to our blogs ??

We are providing informations through our blog, so sometimes we need to give any links or files accordance with the information we shared. so that time we put images to cover the link


Download button


Since they are images they will increase the loading speed of our blog. it will make a bad impact on our SEO since google gives very importance to the loading speed of the website.


So if we can add the html buttons to our blog instead of the images, then that will save us from the slow loading speed of our blog caused by using the unoptimized images.

I already shared a post How To add Animated download button in HTML. And this is an improved version of that post. Here we added hover effects on click and material design to our download button.

In this post, we are adding material design demo and download buttons

Demo and Download Button | Material Design


As we know, now Material Design has become a trend as a web interface or user interface both on mobile and desktop devices on a website page. This web interface is also welcomed by users and website developers because it has a lot of useful features and a more attractive appearance.

So we will provide here simple download button with animation effects and materials Design.


How to Add the Download Button Code


First open Blogger > Go to Themes > Click Edit HTML >

Add CSS code below Above the code ]]></bskin> or </style>

#wrap{margin:20px auto;text-align:center}
#wrap a{text-decoration:none}
.tombolripple{cursor:pointer!important;overflow:hidden;text-decoration:none;display:inline-block;-webkit-appearance:none;font-size:1.7em;border-radius:4px;color:rgba(255,255,255,0.8);font-weight:400;padding:20px 25px;margin:0 15px;box-shadow:0 2px 2px 1px rgba(0,0,0,0.1);transition:all 0.3s}
.tombolripple:hover,.tombolripple:active{box-shadow:0 14px 28px rgba(0,0,0,0.25),0 10px 10px rgba(0,0,0,0.22)}
.tombolripple.tsatu{background:#e67e22}
.tombolripple.tdua{background:#3498db}
.tombolripple.tsatu:hover,.tombolripple.tsatu:active{background:#f49541}
.tombolripple.tdua:hover,.tombolripple.tdua:active{background:#4aaff3}
svg{position:absolute;top:0;left:0;width:100%;height:100%}
circle{fill:rgba(255,255,255,0.07)}
.ripple-effect{position:relative;overflow:hidden;-webkit-transform:translatez(0)}
.teffect{display:block;position:absolute;pointer-events:none;border-radius:50%;transform:scale(0);background:#fff;opacity:0.5}
.teffect.animate{animation:ripple-effect 0.5s linear}
@keyframes ripple-effect{100%{opacity:0;transform:scale(2.5)}}

@-webkit-keyframes ripple-effect{100%{opacity:0;transform:scale(2.5)}}

Then add this jQuery code above the </body>

<script type='text/javascript'>
//<![CDATA[
!function(a){a(".ripple-effect").click(function(b){var c=a(this);0===c.find(".teffect").length&&c.append("<span class='teffect'></span>");var d=c.find(".teffect");if(d.removeClass("animate"),!d.height()&&!d.width()){var e=Math.max(c.outerWidth(),c.outerHeight());d.css({height:e,width:e})}var f=b.pageX-c.offset().left-d.width()/2,g=b.pageY-c.offset().top-d.height()/2;d.css({top:g+"px",left:f+"px"}).addClass("animate")})}(jQuery);
//]]>
</script>

Then save the template

Now for the calling code, add the HTML code in the post where you need this demo and download button. (not in compose)

<div id="wrap">
<a class="tombolripple tsatu ripple-effect" href="#" rel="nofollow" target="_blank">Demo</a>
<a class="tombolripple tdua ripple-effect" href="#" rel="nofollow" target="_blank">Download</a>
</div>

Replace the # with your download link


Conclusion


Now we have added a material design Demo and Download Button on our Blog post.
If you have any doubts regarding this article please mention it in the comment section.


2019 ഫെബ്രുവരി 7, വ്യാഴാഴ്‌ച

How to install blogger template

how to change blogger template, how to install blogger template

how to install blogger template | Blogger is a blog publishing platform provided by Google. And we already discussed How To Create a blog on Blogger. we know by default, blogger provided templates are very boring. But we can change the default templates.

So here is a tutorial on How To Install A Template On Blogger Blog.


How to install blogger template


There are many websites provides free templates and premium templates for Blogger blogs. We can use them to customize our Blogger blogs. To use such templates you need to download the theme file from their websites. The downloaded file will be in zip format so we need to extract it. then you can see a .xml file in the theme folder, that is the file which we need to upload on our blog.


We can't remove footer credits from the free blogger templates. To remove footer credit we need to buy a premium theme.

But there is no problem, we can use free templates by giving proper credits to them. So read my article how to install blogger template and change your default theme , get a premium look

Download  a template from any one of these sites,


#4  Btemplates
  
.

Install The Template


Now we have the template file so we are going to upload it in your blog

Go to your blogger dashboard and click on themes.

you can see a Backup/Restore Button on the top right side, click on the button then a box like this will appear. Here you can see two options Download theme and Backup/restore.

how to change blogger template, how to install blogger template
 
You can take a backup of your existing template by clicking the Download theme button.

To upload your theme click browse and select the .xml file from the unzipped template folder and click the upload button.

After the successful installation, you will get a message uploaded successfully. Then click on the view blog button in the top left area to see your new blog

The documentation for the templates also available, look into the unzipped folder for the documentation file.

Customize the theme as you like with the help of the documentation.

If you have any doubts regarding this article How to install blogger template on your blogger blog please mention it in the comment box,

Was this post helpful? If so, would you consider sharing it with others who might appreciate it as well? Thanks!

2018 ഡിസംബർ 14, വെള്ളിയാഴ്‌ച

How to Highlight Links in Blogger Posts


Change link color in blogger post | The links we given in the blog posts have a crucial role in blog seo.when we put links of related articles in a post, it will make the people spend more time on our blog,this will helps to reduce the bounce rate of the blog, and also in terms of ranking.


For a new blogger, this is a big deal if he uses blogger blog, Most of the free templates doesn't have a code to highlight the links, but some of the templates highlight links when we mouse over it. but it doesn't make any sense if a reader can't see the link when he reaches an article. Who's going to check your article top to bottom for links..Change link color in blogger post

But by a simple method, we can do it manually. First, you need to identify your problem

Understand the problem


  1. Links are highlighting when you mouse over it
  2. Links never highlighting


Probably your theme may be customized to highlight the links when a reader mouses over it, or at the moment when it is clicked, or it may not be customized to highlight links. Change link color in blogger post

Warning! Take a backup of your theme Before making any changes. Change link color in blogger post

Understand the codes


With CSS codes, we can style the links in a different way


/* unvisited link */
a:link {
color: red;
}

/* visited link */
a:visited {
color: green;
}

/* mouse over link */
a:hover {
color: hotpink;
}

/* selected link */
a:active {
color: blue;
}

a: link - a normal unvisited link
a: visited -   a link user has visited 
a: hover  -  a link when the user mouses over it
a: active  - a link the moment clicked 

Fixing the problem


The links are highlighting only when a user mouses over it.

This is because your theme is customized to only highlight links when a user moves the mouse over it. Change link color in blogger post

maybe the code to highlight the link already there, but by default, the color would be $maincolor (default color of your fonts)

we need to check does it have the code or the color code is different from the font color of your blog. Change link color in blogger post

Go to themes > edit HTML  and press ctrl+f  inside the editor, type a: visited or a: hover and search it. you can see a: hover at many places so look carefully and identify the code section. most of the time the first a: hover or a: visited be the code we need to edit.


Change link color in blogger post

If it has only this code

a:hover{
color:#ff00000;
}

Then add this code just above it

a:link{
color:colorcode;
}

If you found the a: visited code like this

a:visited {
color:$maincolor;
}

Just change the $maincolor and replace your color code. Change link color in blogger post

If you can't find none of the above codes then just copy & paste the code given below,  just above the ]]></b:skin> code


The CSS code


a:link {
color: #;
}
a:visited {
color: #;
}
a:hover{
color: #;
}code-box


Replace # with the color code you like and save. Don't do anything more if you have no idea about coding. Change link color in blogger post

Now open your any post and check whether it works.

  • note > If the above code, not works try these code

.post-body a {
color:#;
}
.post-body a:link {
color:#;
}
.post-body a:visited {
color:#;
}
.post-body a:hover {
color:#;
}code-box


Now save your theme by clicking the save button. Change link color in blogger post

you can delete a: hover code if you don't want to change link colour when a user mouse over it.

If you don't know how to add CSS then do it this way


Go to Theme > customization > Advanced > Add CSS.


Paste the CSS codes here and click apply to the blog. Change link color in blogger post

That's all, now you have made it

Conclusion 


In this tutorial, we discussed how to highlight links in blogger posts. I hope you found this tutorial useful. If so, would you consider sharing it with others who might appreciate it as well?

Change link color in blogger post

If you have any doubt regarding this post please comment below

Also read 


© Copyright 2019 GeekSpeakS | All Rights Reserved